Tag Archives: ios

Dynamic Infinite UIPickerView Scrolling Example

In iOS, I’ve seen a lot of examples of creating a UIPickerView with a hardcoded array of strings. This may be necessary if your data set is a list of strings (such as USA states). For numbers, there’s a much easier way to dynamically generate each row’s title.

To start off with, here’s a simple, programmatic UIPickerView implementation that includes the numbers (as strings) 0 through 9:

import UIKit

class ViewController: UIViewController, UIPickerViewDelegate, UIPickerViewDataSource {

    override func viewDidLoad() {
        super.viewDidLoad()
        
        setupPicker()
    }

    var pickerView: UIPickerView = UIPickerView()
    var pickerDataSource = ["0", "1", "2", "3", "4", "5", "6", "7", "8", "9"]
    
    func setupPicker() {
        pickerView.dataSource = self
        pickerView.delegate = self
        
        pickerView.frame = CGRectMake(0, 0, view.frame.width, 300)
        view.addSubview(pickerView)
    }
    
    func pickerView(pickerView: UIPickerView, titleForRow row: Int, forComponent component: Int) -> String? {
        return pickerDataSource[row]
    }
    
    // columns count
    func numberOfComponentsInPickerView(pickerView: UIPickerView) -> Int {
        return 1
    }
    
    // rows count
    func pickerView(pickerView: UIPickerView, numberOfRowsInComponent component: Int) -> Int {
        return pickerDataSource.count
    }
}

The key piece is the pickerDataSource that gives us our data source. It is an array literal, and in a worst case programming scenario, one can imagine a very, very long hardcoded array of looping “0” – “9”. A long hardcoded array works, but is not optimal for many reasons.

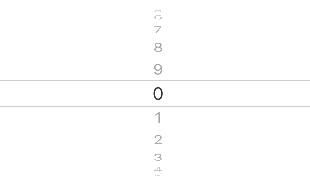
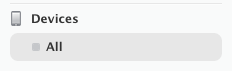
The code above looks like this in the simulator:

manual_ss

We can improve and change this in many ways. We are going to update the code to operate without using a hardcoded array literal. Also, the user has to scroll up (or down) for a very, very long time before they hit the end of the picker. When their scrolling stops, we will move the position of the selected row back to the middle, so that when they scroll again, there is a long way to go before they get to the top (or bottom).

import UIKit

class ViewController: UIViewController, UIPickerViewDelegate, UIPickerViewDataSource {
    
    var pickerView: UIPickerView = UIPickerView()
    let pickerDataSize = 100_000
    
    override func viewDidLoad() {
        super.viewDidLoad()
        
        setupPicker()
    }
    
    func setupPicker() {
        pickerView.dataSource = self
        pickerView.delegate = self
        
        pickerView.frame = CGRectMake(0, 0, view.frame.width, 300)
        view.addSubview(pickerView)
        
        // set the picker to the middle of the long list
        pickerView.selectRow(pickerDataSize/2, inComponent: 0, animated: false)
    }
    
    func pickerView(pickerView: UIPickerView, titleForRow row: Int, forComponent component: Int) -> String? {
        return String(row % 10)
    }
    
    func pickerView(pickerView: UIPickerView, didSelectRow row: Int, inComponent component: Int) {
        // do something with the resulting selected row
        
        // reset the picker to the middle of the long list
        let position = pickerDataSize/2 + row
        pickerView.selectRow(position, inComponent: 0, animated: false)
    }
    
    // columns count
    func numberOfComponentsInPickerView(pickerView: UIPickerView) -> Int {
        return 1
    }
    
    // rows count
    func pickerView(pickerView: UIPickerView, numberOfRowsInComponent component: Int) -> Int {
        return pickerDataSize
    }
}

In this 2nd code snippet for our ViewController, we have created a large number, pickerDataSize, that tells our device how many rows there are. The neat thing is that we don’t need to create an array of 100K items. When the UIPickerViewDelegate’s titleForRow method is called, it uses the row to dynamically return a string for that given row. Progress!

As a bonus, I went ahead and added a call to pickerView.selectRow in the didSelectRow function. When the user finishes selecting a row, this call will silently (animated: false) move the selected row back to the middle of the rows. This will maintain the illusion of infinite scrolling. Success!

Here we can see the updated, dynamic picker view:

dynamic_ss

Logging during development with Apple Watch hardware

Inserting breakpoints or logging statements (such as NSLog) is relatively straightforward with an iPhone-only iOS app. But how do you log from the WatchKit Extension (aka Watch app)?

The good news is that logging isn’t filled with many complicated steps. The bad news is that the logging works intermittently.

  1. Add your NSLog statements in your WatchKit Extension. This is probably your InterfaceController.m
  2. Run the watch app on iOS Device + watchOS Device (in the WatchKit App scheme)
  3. Select Debug > Attach to Process > (click on your watch app name)
  4. Profit! You should see your NSLogs when they are triggered in the app lifecycle in Xcode

debug

If logging isn’t working, try typical Xcode debug steps such as:

  • deleting the app on your phone & re-running it in Xcode
  • restarting the phone and/or watch devices
  • clean Xcode (cmd + shift + k) and re-run the app
  • quit & restart Xcode

Apple GameCenter Implementation Strategy

Having worked on my first app that implements GameCenter, I had a lot of questions about the process. The main question was how do I implement GameCenter into my app? Do I need to pick the right application template when creating my Xcode project? Do I need to use SpriteKit? Etc

The good news is that GameCenter can be added on after the rest of your application is ready. You should focus on your game mechanics, game engine, user friendliness, etc. After you are satisfied with the core experience, you can add GameCenter (leaderboard, achievements, and other features) afterwards. You can choose any application template and you don’t have to use SpriteKit.

In my app, I had both a phone app & a watch app. You will need to implement GameCenter using Apple’s GameKit Framework. GameKit is currently only for the iPhone, so GameCenter logic needs to be called in the Phone app.

I found great Apple documentation with the same advice:

Here’s a reasonable process to follow when designing a game that supports Game Center:

  1. Decide which Game Center features you plan to support.
  2. Define your game mechanics, keeping in mind the requirements and limitations of Game Center.
  3. Implement your game engine, ignoring Game Center for now. Focus on developing the other aspects of your game, such as your game engine and gameplay. You do this to avoid needing to create an iTunes Connect record earlier than you need to.
  4. [implement Game Center]

As with any app, focus on nailing the key user experience. Then worry about implementing/integrating GameCenter in your app.

Setup Apple Watch for Development Guide

While working in Xcode and running my watch app on my actual hardware watch for the first time, I ran into this error on my watch the first time: “Failed to install [app], error: Application Verification Failed.” This stack overflow answer provides the solution, but I wanted help illustrate the steps I took to fix the error. Disclaimer: this worked for me, but there are probably more optimal ways of fixing the error.

  1. In Xcode, get the UDID of your Apple Watch (WIndow > Devices). The UDID is labeled “Identifier” and you can double click on the Identifier device hash to select & copy it.
    1
  2. Visit the Apple Developer Portal at https://developer.apple.com/devcenter/ios/index.action and click on “Certificates, Identifiers & Profiles” in the right sidebar.
    2
  3. Click on Devices > All in the left sidebar.
    3
  4. Click on the Plus Sign (+) in the top right.
    4
  5. In Register Device, provide a Name (whatever you want) and your watch UDID (from step 1 above).
    5
  6. Submit the form to register your watch device.
  7. In “Certificates, Identifiers & Profiles”, locate your .watchkitextension Provisioning Profile for your app. Select & download this profile.
    7
  8. Locate your downloaded profile file on your computer & double click the Provisioning Profile.
  9. Restart Xcode.
  10. Build your project and you will encounter a iOS Development Certificate alert.
    10
  11. Warning, this step may be dangerous (proceed at your own risk). This worked for me. Click on “Revoke and Request”. This will revoke your current certificate and request a new one. You will probably get an email notifying you that “Your Certificate Has Been Revoked”.
  12. Run your Xcode project. Your watch app should now load the development build on your actual watch hardware.

About the author: Rex Feng enjoys iOS development and has released Pomodoro Pro for the iPhone & Apple Watch. You can follow him @rexfeng.

Pomodoro Pro WatchKit Architecture

My iOS app, Pomodoro Pro, is a constant work in progress. This post discusses how Apple Watch support was added to v1.1.0. Pomodoro Pro is a free, easy to use app for getting work done in continuous work & break cycles.

If you’ve looked into Apple Watch development, you’ve learned that the watch portion is an extension of your phone app. Your phone app is the brains of the operation, and your watch app relies on the phone app to do anything.

2 Way Event Binding Demo

From watch to phone

watch-final

From phone to watch

phone_8

App Lifecycle

With mobile development, it’s necessary to understand when a user will come into contact with your application. If the user comes across your application and starts using it when the visuals are incorrect, the user will lose confidence and not trust your application.

Working with Xcode and the watch simulator, my app has the following key lifecycle events:

  • watch starts up
  • watch resumes
  • watch actions (button presses) are reflected on both the watch & phone
  • phone actions (button presses) are reflected on both the phone & watch

Each of these events are essential for maintaining a consistent user experience that does not surprise the user.

Implementation

My implementation used MMWormhole for 2 way event binding. This means that the phone should know when a button was pressed on the watch and vice versa. Curtis Herbert has a great blog post on sharing data and events.

In order to have the phone app be responsible for the correct timer state, my phone app is responsible for returning a NSDictionary of the current timer properties. My watch app is able to get the NSDictionary and update the watch screen accordingly. It is important to note that my phone app is the ONLY source of the canonical current timer state. Trying to sync state between the phone and watch app would be a nightmare and a lot of work.

When the watch app starts, the watch app asks the phone for the current timer state (a NSDictionary) in order to set itself up correctly. When the watch app resumes from inactivity, it also asks the phone for the current timer state (a NSDictionary).

Using MMWormhole, I’m able to listen on events from the watch or the phone. When the user presses a button on the watch, the watch app passes a message to notify the phone, and the phone updates the timer state. Similarly, when the user presses a button on the phone, the phone app updates the timer state and notifies the watch app with the latest state.

Lessons Learned

  1. The phone app (not the watch app) is responsible for the correct state
  2. Use a Framework or shared classes (in File Inspector, add Target Membership) to DRY (don’t repeat yourself) out your codebase

Summary

With Pomodoro Pro, it was essential for a user to be able to start / pause / resume / stop the timer from either the phone app or the watch app. This required a way to manage the timer state (phone app) and have user actions occur on all screens (phone & watch).

In order to build a user friendly watch app, you should anticipate & identify where your app’s state and events come from. Make sure to account for those scenarios.

Pomodoro Pro v1.1.0 went live on 4/14/2015. Please let me know what you think @rexfeng

Fix no matching provisioning profiles validation issue

Here’s a quick problem & solution that worked for me. Hopefully this helps others out there.

Situation:

Validating an archive prior to submitting the build to the App Store, but it fails validation. I am using App Groups (for the phone app & watch app).

Problem:

Validating my archive created two “no matching provisioning profiles found” errors. The error was specifically related to “none of the valid provisioning profiles allowed the specified entitlements betareports-active com.apple.security.application-groups”.

Solution:

In my case, my development was able to use App Groups, but the production/distribution environment was not setup yet.

Under Provisioning Profiles > Distribution (https://developer.apple.com/account/ios/profile/), create an Distribution / App Store for each App ID that you need. In my case, I had to create one for the phone app & one for the watchkit extension. Make sure to download each after generating them. Double click on your downloaded files to automatically load them into Xcode.

When I tried to validate my archive again, I was able to successfully validate (after generating & loading my new Provisioning Profiles).

Standing on the Shoulders of Documentation

sprout123

Learning how to build a simple iOS app has not been bad. There’s a lot of learning how to find things in Xcode (protip: get a 2nd screen) and familiarizing myself with UIKit conventions. I completed the bitfountain iOS 7 course and have subscribed to more iOS newsletters than I care to admit.

At a meetup last year, I had a discussion about my choice to start with Objective-C. He asked me why I didn’t jump into Swift or use a tool like PhoneGap. Fast forward several months to today, I’m very happy I went with Objective-C. Whenever I am unsure how to do something in Objective-C, there are endless helpful blog posts and StackOverflow discussions out there. Even blog posts written before 2010 can be helpful. I am truly standing on the shoulders of all those heroic individuals who’ve tread down the path before me years ago.

With Swift, I’m sure there’s great documentation out there, but my guess is that Swift today (the beginning of 2015) cannot compete with the thoroughness of Objective-C edge cases discussed on the Internet.

Access to simple, basic questions like converting a NSUInteger to a NSNumber are essential for those just starting out. I’d like to use the example of an extremely beginner friendly resource, RailsCasts, which taught you how to use run of the mill gems, like Devise, and helped create a new generation of developers. Without a wealth of beginner accessible resources, a language or framework can’t grow or grow as fast.

iOS Programming

I’ve started learning iOS programming. Objective-C seems very low level, but it’s alright as an older object oriented language. Learning the Apple frameworks seems to the be tricky part. There’s a lot for me to learn with using Xcode (since I don’t normally use IDEs) and frameworks like Cocoa Touch.

I spoke to someone recently who suggested skipping Objective-C and going directly to Swift. Or even a tool like PhoneGap. Personally, I side with Aaron Hillegass’ take:

I have three messages for these people:

  • If you want to be an iOS developer, you will still need to know Objective-C.
  • Objective-C is easier to learn than Swift. Once you know Objective-C,
  • it will be easy to learn Swift.

To take a longer perspective on iOS, I want to build my foundation up from Objective-C to iOS. This is similar to how learning Ruby is critical for being a Rails developer.

With that said, I’m eager to get my hands dirty with iOS prototypes through different online courses.

iOS Simulator

When previewing a site on my iPhone (1136 x 640), I wasn’t satisfied with using my iPhone 5 or a Chrome browser Window Resizer app.

Turns out it’s super simple to use the iOS Simulator with Xcode on OS X (version 10.8.5).

Select Xcode > Open Developer Tool > iOS Simulator

xcode

You’ll be presented with an iPhone to navigate within. Select Safari and you can use a site like localhost:3000 for development.

 
ios_sim