Tag Archives: ios

Manage Sandbox Account on iPhone (iOS 14)

While working with iOS 14 and IAPs, I was looking for the Sandbox Account management section in iOS Settings. Older guides online reference “iTunes & App Stores”, but it is somewhere else now.

From what I’ve read online, it seems like the 1st step is to attempt an IAP on your iPhone running your development build (with Xcode). You’ll be prompted to sign in, so use your App Store Connect Sandbox Tester credentials.

Afterwards, I was able to find Sandbox at the following location:
* open Settings app
* scroll down & select ‘App Store’
* scroll down & find ‘SANDBOX ACCOUNT’

Here, you can manage or sign out of your Sandbox Apple ID.

How to install iOS 13 beta (for developers)

With an Apple developer account, you can install the iOS 13 beta. Warning: you should backup your existing device before installing the iOS 13 beta, and “install only on systems you are prepared to erase if necessary.”

From the Apple Developer Download page, you can find the Restore Images. Find your device among the list at https://developer.apple.com/download/#ios-restore-images-iphone-new to download the .ipsw

Next use iTunes & follow Apple’s guide (Installation Using the Restore Image)

  • Make sure you are running the latest version of iTunes on your Mac.
  • Open iTunes on your Mac.
  • Connect your iOS device to your computer with the cable that came with your device.
  • If you’re prompted for your device passcode or to Trust This Computer, follow the onscreen steps. If you forget your passcode, help is available.
  • Select your iOS device when it appears in iTunes.
  • In the Summary panel, hold the Option key and click the Check for Update button.
  • Select the iOS beta software restore image and click Open to start the installation.
  • After installing the beta, your device will reboot and will require a network connection to complete activation.

Follow the on screen instructions and you’ll have iOS 13 beta running on your device.

Note: I ran into an error “Can’t install the software because it is not currently available from the Software Update server”. I waited for my iPhone to fully boot up and I’m able to use iOS 13 beta (despite that error message).

Overall, the experience wasn’t too bad. This is a developer beta and not intended for widespread public distribution. If you are interested in the public beta for iOS 13, you can sign up here https://beta.apple.com/sp/betaprogram/

iOS 12 Siri Shortcuts

The latest update (v1.3.6) of my iPhone app, Power Focus, passed app review today! The App Store review turnaround is amazing nowadays. Super quick.

My app includes minimal iOS 12 Siri Shortcuts support. Watching the WWDC session, there’s two ways to add Siri Shortcuts support: NSUserActivity & Intents. I went with the former since I didn’t need custom Siri UI.

Of different online resources, Anton’s medium post was really helpful as it covers the essentials of using NSUserActivity. With NSUserActivity, the important parts are donating Shortcuts during app usage and handling them in your App Delegate. That’s it.

The experience of implementing minimal iOS 12 Siri Shortcuts was painless and I would recommend your app using NSUserActivity to inform iOS when key actions occur.

Using SVG / PDF assets in your iOS app

This guide covers a simple way to use SVG (Scalable Vector Graphics) assets in your iOS app. This was tested on macOS High Sierra 10.13 with Xcode 9.4 and Swift 4.

There are many websites where you can find SVG icons. Check out Material or ionicons

  1. Install homebrew & python3 for macOS (if you don’t have it)
  2. Install cairosvg. The code below installs various dependencies
    brew install python3 cairo pango gdk-pixbuf libffi
    
    pip3 install cairosvg
  3. Convert your SVG icons to PDF files. Make sure to navigate to the location of your SVG icon files. Run this command for each icon file (with the relevant *.svg & *.pdf input / output file name):
    cairosvg icon.svg -o icon.pdf
  4. Drag your PDF files into your Xcode Assets.xcassets folder
  5. Adjust the settings for each icon in your xcassets. You may want to adjust:
    1. Name – this is important as you will refer to this in your Swift code to use the icon
    2. Set ‘Render As’ to ‘Template Image’
    3. Check the box for ‘Resizing – Preserve Vector Data’
    4. Set ‘Scales’ to ‘Single Scale’
  6. Use your icon in your app. I did this programmatically in Swift, and this works in your ViewController. Make sure to update the ‘iconName’ to match what is in your xcassets for your icon file.
    if let icon = UIImage(named: "iconName") {
        let image = UIImageView(image: icon)
        image.translatesAutoresizingMaskIntoConstraints = false
        image.tintColor = UIColor.blue
        view.addSubview(image)
    
        NSLayoutConstraint.activate([
            image.leadingAnchor.constraint(equalTo: view.leadingAnchor),
            image.centerYAnchor.constraint(equalTo: view.centerYAnchor),
            image.widthAnchor.constraint(equalToConstant: 24),
            image.heightAnchor.constraint(equalToConstant: 24),
            ])
    }
  7.  That’s it. Your SVG file was converted to a PDF file, added into your Xcode assets, and called from your ViewController!

Intro to Computer Vision

I’m new to computer vision and a lot of the basic concepts are very interesting. As an iOS developer, my interests comes from using CoreML & Apple’s Vision in apps to improve the user experience.

Two common tasks are classification and object detection. Classification allows you to detect dominant objects present in an image. For example, classification can tell you that photo is probably of a car.

Object detection is much more difficult since it not only recognizes what objects are present, but also detects where they are in the image. This means that object detection can tell you that there is probably a car within these bounds of the image.

What’s important is that the machine learning model runs in an acceptable amount of time. Either asynchronous in the background or in real time. Apple provides a listing of sample models for classification at https://developer.apple.com/machine-learning/.

For real time object detection, TinyYOLO is an option, even if the frame rate is not near 60 fps today. Other real time detection models like YOLO or R-CNN are not going to provide a sufficient experience on mobile devices today.

One other interesting thing I came across is the PASCAL Visual Object Classes (VOC). These are common objects used for benchmarking object classification.

For 2012, the twenty object classes that have been selected were:

  • Person: person Animal: bird, cat, cow, dog, horse, sheep
  • Vehicle: aeroplane, bicycle, boat, bus, car, motorbike, train
  • Indoor: bottle, chair, dining table, potted plant, sofa, tv/monitor

These are common objects used to train classification models.

Computer vision used with machine learning has a tremendous amount of potential. Whether used with AR or other use cases, they can provide a compelling user experience beyond Not Hotdog.

How to use child View Controllers in Swift 4.0 programmatically

I’ve just released my Learn to read Korean app for iPhone. It uses a number of child View Controllers in the home screen. While child View Controllers are not a new thing, it was a new experience for me, and I greatly recommend them to reduce the clutter of your View Controllers.

Here’s a photo of my home screen:

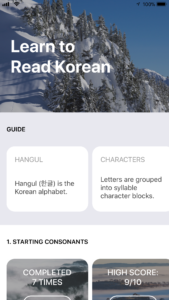
The main view controller consists of a vertical UIScrollView and multiple horizontal scrolling UICollectionViews below. While it’s possible to do it all in one massive View Controller, it’s much better to delegate UICollectionView events to their individual child View Controllers.

The good news is that using child UIViewControllers is super easy. You can use your Storyboard or do it programmatically in your UIViewController files. I opted for the latter as I find it easier to reproduce across Xcode projects.

All you need to do to add a child View Controller is below. I included an optional constraints section.

// Create child VC
let childVC = UIViewController()

// Set child VC
self.addChildViewController(childVC)

// Add child VC's view to parent
self.view.addSubview(childVC.view)

// Register child VC
childVC.didMove(toParentViewController: self)

// Setup constraints for layout
childVC.view.translatesAutoresizingMaskIntoConstraints = false
childVC.view.topAnchor.constraint(equalTo: heroView.bottomAnchor).isActive = true
childVC.view.leftAnchor.constraint(equalTo: self.view.leftAnchor).isActive = true
childVC.view.widthAnchor.constraint(equalTo: self.view.widthAnchor).isActive = true
childVC.view.heightAnchor.constraint(equalToConstant: height).isActive = true

With multiple child VCs (each handling their own UICollectionView events), the code base becomes manageable. In each child View Controller, you can handle customization, such as background color, UILabels, UIButtons, etc.

Another tip I have is to use the UIView’s convert(_:to:) method as necessary. You may need to get the child subview’s position relative to your parent View Controller’s view (such as for an UIViewControllerTransitioningDelegate). The code for that is simple too:

// contrived example label in Child VC to get parent frame
let label = UILabel()
let childViewFrame = label.frame
let frameInParent = label.convert(childViewFrame, to: parentVC.view)

That’s all I wanted to share for today. Don’t be afraid of using child View Controllers to break up your massive View Controllers!

Vertically Scrolling UIImage programmatically

Working on a small side project, I wanted to display images in my view controller view at full device width in a vertical scrolling view. Sounds simple right? The good news is that it is. While you may want to use UITableView for more control, using UIStackView is a simpler way to get up and running fast.

For my sample code, I opted to do it programmatically as it’s easier to copy & paste code than explain what constraints to add in Xcode. Also note that the code presented here is a proof of concept, quick and dirty example (not intended for production).

The steps are easy to understand:

  1. Add a scroll view to your view
            self.scrollView = UIScrollView()
            scrollView.translatesAutoresizingMaskIntoConstraints = false
            view.addSubview(scrollView)
    
            scrollView.topAnchor.constraint(equalTo: view.safeAreaLayoutGuide.topAnchor).isActive = true
            scrollView.bottomAnchor.constraint(equalTo: view.safeAreaLayoutGuide.bottomAnchor).isActive = true
            scrollView.leadingAnchor.constraint(equalTo: view.safeAreaLayoutGuide.leadingAnchor).isActive = true
            scrollView.trailingAnchor.constraint(equalTo: view.safeAreaLayoutGuide.trailingAnchor).isActive = true
  2. Add a stack view to your scroll view
            self.stackView = UIStackView()
            stackView.translatesAutoresizingMaskIntoConstraints = false
            stackView.axis = .vertical
            stackView.spacing = 23.0
            scrollView.addSubview(stackView)
    
            scrollView.addConstraints(NSLayoutConstraint.constraints(withVisualFormat: "H:|[stackView]|", options: NSLayoutFormatOptions.alignAllCenterX, metrics: nil, views: ["stackView": stackView]))
            scrollView.addConstraints(NSLayoutConstraint.constraints(withVisualFormat: "V:|[stackView]|", options: NSLayoutFormatOptions.alignAllCenterX, metrics: nil, views: ["stackView": stackView]))
  3. Add images to your stack view
    stackView.addArrangedSubview(image(filename: "photo1"))

For the full code, read the ViewController on GitHub

Hope this helps you if you’re trying to throw together a quick prototype of vertically scrolling images in iOs.

ARKit Impressions

I’ve been working with ARKit recently. I am planning on releasing an AR basketball game when iOS 11 is released.

Here are misc thoughts about working with ARKit:

  • It’s hard to find answers to common questions about doing simple things in ARKit. Searching for SceneKit yields slightly more results, but even that is sparse. The Apple developer SceneKit & ARKit forums don’t appear to have much activity either. So it’s up to StackOverflow & random Internet blog posts
  • Working with ARKit means working with SceneKit. SceneKit is Apple’s framework to make working with 3D assets easier for developers. Working with SceneKit & 3D is something that I’m new to. A lot of the math around position, orientation, euler angles, transforms, etc. can get complex fast when it involves matrix transforms and quaternions.
  • It’s really hard to find assets for DAE/collada. The DAE format is meant to be interchange format for various 3D software to communicate with each other. The reality is that exporting to DAE or converting from one format to DAE is a crapshoot. I’ve used Blender briefly to look at 3d assets, but digging into 3D modeling is a huge time sink for some one looking to get involved in ARKit. I wish there was an online store that focused on selling low poly (<10K), DAE files.
  • Related, working with 3D assets as someone new to 3D assets is very frustrating. The concept of bounds vs scaling as they relate to importing into your SceneKit scene was very challenging (with the 3D model that I imported). If you have your own in-house or contracted 3D modeler, you should get 3D assets that work well with SceneKit, but I had countless issues with off the shelf 3D models & file formats.
  • After you’re able to import your 3D model, modeling the physics geometry can be a challenge. SceneKit allows you to import the geometry for your physics body as-is using ConcavePolyhedron, but you probably don’t want that. I had to manually recreate a basketball hoop using multiple shapes combined into a single SCNNode.
  • ARKit is not all powerful. The main feature that ARKit gives you is horizontal plane detection. Occlusion doesn’t come with ARKit. Expect many apps that deliver an experience reliant on a plane/surface like your desk or the floor.

ARKit is exciting, but don’t expect the world yet. Future ARKit releases & better iOS hardware should provide more compelling experiences. Today, you can expect to play with 3D models on a surface (with surface interaction) or in the air (with limited or no environment interaction).

Multiple UIDynamicAnimators

In past apps, I tended to have one UIDynamicAnimator in my ViewController and that was that. UIDynamicAnimator allows you to use UIDynamics / effects on your UIViews.

The issue that I ran into was that removeBehavior(_:), which “Removes a specified dynamic behavior from a dynamic animator“, didn’t seem to work. I would keep track of specific UIDynamicBehavior instances and pass them as the argument for removeBehavior(_:) but it didn’t appear to remove the behavior.

What does work is calling removeAllBehaviors() on the UIDynamicAnimator. This is fine if you only have one UIView. But most likely, you have multiple UIViews & behaviors. Calling remove all on the only animator isn’t a good idea. That could leave UIViews frozen out of place.

Recently, I released a fun weekend app, Fun Faces. Browsing stack overflow, it occurred to me to use multiple UIDynamicAnimators. One for each UIView I wanted to animate. This worked for my use case, where calling removeAllBehaviors() doesn’t interrupt the other UIView’s behaviors (if any).

Using multiple UIDynamicAnimators isn’t an answer if you have multiple UIViews under the same animator with UICollisionBehavior or other effects that let the UIViews interact with each other.

Using CoreMotion deviceMotion to keep image level example (Xcode 8.3, Swift 3.1)

I’ve been playing around with CoreMotion since it is frankly so cool. I’ve followed NSHipster’s CMDevice​Motion post, but I made some changes to use the latest Swift v3.1. Below is sample code for using both the gyroscope and accelerometer to keep an image level when you rotate your phone.

//
//  ViewController.swift
//
//  Created by Rex on 4/22/17.
//

import UIKit
import CoreMotion

class ViewController: UIViewController {

    let interval = 0.01
    let imageFilename = "bg.jpg"
    let imageWidth = CGFloat(800)
    let imageHeight = CGFloat(1200)
    
    let manager = CMMotionManager()
    var imageView: UIImageView?

    override func viewDidLoad() {
        super.viewDidLoad()

        guard manager.isDeviceMotionAvailable else { return }
        
        setImageView()
        
        manager.deviceMotionUpdateInterval = interval
        let queue = OperationQueue()
        
        manager.startDeviceMotionUpdates(to: queue, withHandler: {(data, error) in
            guard let data = data else { return }
            let gravity = data.gravity
            let rotation = atan2(gravity.x, gravity.y) - .pi

            OperationQueue.main.addOperation {
                self.imageView?.transform = CGAffineTransform(rotationAngle: CGFloat(rotation))
            }
        })
    }
    
    func setImageView() {
        if let img = UIImage(named: imageFilename) {
            let iv = UIImageView(image: img)

            // center the image
            let x = (self.view.frame.width/2)-(imageWidth/2)
            let y = (self.view.frame.height/2)-(imageHeight/2)
            iv.frame = CGRect(x: x, y: y, width: imageWidth, height: imageHeight)
            
            self.view.addSubview(iv)
            self.imageView = iv
        }
    }
    
}

The setup is simple. Create a new Single View Application project in Xcode. You’ll need to add a JPG to the Assets.xcassets folder in the project. Replace the Viewcontroller with the code below and make sure to update the image filename, width, and height constants.

The code hopefully is straightforward. We make sure the CMMotionManager’s device motion is available. Then, we add the imageview (as the only UIView element we’re adding to the screen). We use an OperationQueue to process the rotation calculation off the main queue. Then we update the imageview with a transform on the main queue.