Tag Archives: xcode

Installing Ruby 2.X on Intel macOS Monterey (12.6)

In this guide, we’ll be using rvm & homebrew to install Ruby 2.X on our Intel Mac. The key is to specify the location of openssl.

First, make sure you have Xcode Command Line Tools installed on your mac. You can install it with

        xcode-select --install

Then install openssl (v1.1):

        brew install openssl@1.1

To install Ruby on my Mac, I’ve had to specify the openssl directory when compiling Ruby. Make sure to replace “2.7.8” with your target Ruby version.

        rvm install 2.7.8 --with-openssl-dir=`brew --prefix openssl@1.1`

You can set this version of Ruby as your default version with rvm:

        rvm use --default 2.7.8

That’s it! Installing older versions of Ruby isn’t too tough.

Using SVG / PDF assets in your iOS app

This guide covers a simple way to use SVG (Scalable Vector Graphics) assets in your iOS app. This was tested on macOS High Sierra 10.13 with Xcode 9.4 and Swift 4.

There are many websites where you can find SVG icons. Check out Material or ionicons

  1. Install homebrew & python3 for macOS (if you don’t have it)
  2. Install cairosvg. The code below installs various dependencies
    brew install python3 cairo pango gdk-pixbuf libffi
    
    pip3 install cairosvg
  3. Convert your SVG icons to PDF files. Make sure to navigate to the location of your SVG icon files. Run this command for each icon file (with the relevant *.svg & *.pdf input / output file name):
    cairosvg icon.svg -o icon.pdf
  4. Drag your PDF files into your Xcode Assets.xcassets folder
  5. Adjust the settings for each icon in your xcassets. You may want to adjust:
    1. Name – this is important as you will refer to this in your Swift code to use the icon
    2. Set ‘Render As’ to ‘Template Image’
    3. Check the box for ‘Resizing – Preserve Vector Data’
    4. Set ‘Scales’ to ‘Single Scale’
  6. Use your icon in your app. I did this programmatically in Swift, and this works in your ViewController. Make sure to update the ‘iconName’ to match what is in your xcassets for your icon file.
    if let icon = UIImage(named: "iconName") {
        let image = UIImageView(image: icon)
        image.translatesAutoresizingMaskIntoConstraints = false
        image.tintColor = UIColor.blue
        view.addSubview(image)
    
        NSLayoutConstraint.activate([
            image.leadingAnchor.constraint(equalTo: view.leadingAnchor),
            image.centerYAnchor.constraint(equalTo: view.centerYAnchor),
            image.widthAnchor.constraint(equalToConstant: 24),
            image.heightAnchor.constraint(equalToConstant: 24),
            ])
    }
  7.  That’s it. Your SVG file was converted to a PDF file, added into your Xcode assets, and called from your ViewController!

My Aging MacBook Situation

My personal daily driver is a 2011 MacBook Air (MBA). I’ve shipped 6 iPhone apps from it. For a computer bought in 2011, I’m happy with how long it has lasted.

I am interested in buying a new MacBook Pro (MBP) to replace my aging MacBook Air, but I’m not sure what to do. The possible choices I see are:

1.) the current MBP (June 2017 version)
2.) wait ? months for an updated MBP (most likely a minor CPU refresh)
3.) a 2015 MBP version (older hardware style with IMHO better keyboard)

Reasons to upgrade sooner:
* Xcode runs poorly on my MBA. Storyboard, Simulator, and Playgrounds are barely usable.
* macOS Mojave will not run on my MacBook Air. It’s only a matter of time before I’m locked out of macOS & Xcode updates.
* Apple announced a Keyboard Service Program.
* As a professional software developer, I can easily justify 2-3 year upgrade cycles.
* My MBA is showing it’s age; the battery is virtually gone.

Reasons to upgrade later:
* My MBA is able to run Xcode 9 (current) and will hopefully run Xcode 10 GM.
* Buying after a new hardware refresh (minor CPU bump most likely) maximizes the currentness of the purchase. This may not be rational, but it’s a factor nonetheless.
* My iPhone app development is primarily dependent on iPhone hardware updates & Xcode, not my Mac.
* Indecision – since none of the current MBP options (2015 or 2017) are very appealing, I can wait it out.

Reasons that don’t make a difference:
* I don’t like typing on the current generation MBP keyboard, but the next significant MBP hardware refresh is probably a few years away (too long).
* USB-C – I’ve found a Multi-Port Adapter (dongle) that works for me.

Inconclusion

In retrospect, I should have bought a decently equipped 2015 MBP in 2015.

If Xcode 10 GM doesn’t work on my Mac, then I’ll be forced to buy a new Mac right away. Otherwise I will wait around hoping Apple decides to update the MBP.

How to use child View Controllers in Swift 4.0 programmatically

I’ve just released my Learn to read Korean app for iPhone. It uses a number of child View Controllers in the home screen. While child View Controllers are not a new thing, it was a new experience for me, and I greatly recommend them to reduce the clutter of your View Controllers.

Here’s a photo of my home screen:

The main view controller consists of a vertical UIScrollView and multiple horizontal scrolling UICollectionViews below. While it’s possible to do it all in one massive View Controller, it’s much better to delegate UICollectionView events to their individual child View Controllers.

The good news is that using child UIViewControllers is super easy. You can use your Storyboard or do it programmatically in your UIViewController files. I opted for the latter as I find it easier to reproduce across Xcode projects.

All you need to do to add a child View Controller is below. I included an optional constraints section.

// Create child VC
let childVC = UIViewController()

// Set child VC
self.addChildViewController(childVC)

// Add child VC's view to parent
self.view.addSubview(childVC.view)

// Register child VC
childVC.didMove(toParentViewController: self)

// Setup constraints for layout
childVC.view.translatesAutoresizingMaskIntoConstraints = false
childVC.view.topAnchor.constraint(equalTo: heroView.bottomAnchor).isActive = true
childVC.view.leftAnchor.constraint(equalTo: self.view.leftAnchor).isActive = true
childVC.view.widthAnchor.constraint(equalTo: self.view.widthAnchor).isActive = true
childVC.view.heightAnchor.constraint(equalToConstant: height).isActive = true

With multiple child VCs (each handling their own UICollectionView events), the code base becomes manageable. In each child View Controller, you can handle customization, such as background color, UILabels, UIButtons, etc.

Another tip I have is to use the UIView’s convert(_:to:) method as necessary. You may need to get the child subview’s position relative to your parent View Controller’s view (such as for an UIViewControllerTransitioningDelegate). The code for that is simple too:

// contrived example label in Child VC to get parent frame
let label = UILabel()
let childViewFrame = label.frame
let frameInParent = label.convert(childViewFrame, to: parentVC.view)

That’s all I wanted to share for today. Don’t be afraid of using child View Controllers to break up your massive View Controllers!

ARKit Impressions

I’ve been working with ARKit recently. I am planning on releasing an AR basketball game when iOS 11 is released.

Here are misc thoughts about working with ARKit:

  • It’s hard to find answers to common questions about doing simple things in ARKit. Searching for SceneKit yields slightly more results, but even that is sparse. The Apple developer SceneKit & ARKit forums don’t appear to have much activity either. So it’s up to StackOverflow & random Internet blog posts
  • Working with ARKit means working with SceneKit. SceneKit is Apple’s framework to make working with 3D assets easier for developers. Working with SceneKit & 3D is something that I’m new to. A lot of the math around position, orientation, euler angles, transforms, etc. can get complex fast when it involves matrix transforms and quaternions.
  • It’s really hard to find assets for DAE/collada. The DAE format is meant to be interchange format for various 3D software to communicate with each other. The reality is that exporting to DAE or converting from one format to DAE is a crapshoot. I’ve used Blender briefly to look at 3d assets, but digging into 3D modeling is a huge time sink for some one looking to get involved in ARKit. I wish there was an online store that focused on selling low poly (<10K), DAE files.
  • Related, working with 3D assets as someone new to 3D assets is very frustrating. The concept of bounds vs scaling as they relate to importing into your SceneKit scene was very challenging (with the 3D model that I imported). If you have your own in-house or contracted 3D modeler, you should get 3D assets that work well with SceneKit, but I had countless issues with off the shelf 3D models & file formats.
  • After you’re able to import your 3D model, modeling the physics geometry can be a challenge. SceneKit allows you to import the geometry for your physics body as-is using ConcavePolyhedron, but you probably don’t want that. I had to manually recreate a basketball hoop using multiple shapes combined into a single SCNNode.
  • ARKit is not all powerful. The main feature that ARKit gives you is horizontal plane detection. Occlusion doesn’t come with ARKit. Expect many apps that deliver an experience reliant on a plane/surface like your desk or the floor.

ARKit is exciting, but don’t expect the world yet. Future ARKit releases & better iOS hardware should provide more compelling experiences. Today, you can expect to play with 3D models on a surface (with surface interaction) or in the air (with limited or no environment interaction).

Multiple UIDynamicAnimators

In past apps, I tended to have one UIDynamicAnimator in my ViewController and that was that. UIDynamicAnimator allows you to use UIDynamics / effects on your UIViews.

The issue that I ran into was that removeBehavior(_:), which “Removes a specified dynamic behavior from a dynamic animator“, didn’t seem to work. I would keep track of specific UIDynamicBehavior instances and pass them as the argument for removeBehavior(_:) but it didn’t appear to remove the behavior.

What does work is calling removeAllBehaviors() on the UIDynamicAnimator. This is fine if you only have one UIView. But most likely, you have multiple UIViews & behaviors. Calling remove all on the only animator isn’t a good idea. That could leave UIViews frozen out of place.

Recently, I released a fun weekend app, Fun Faces. Browsing stack overflow, it occurred to me to use multiple UIDynamicAnimators. One for each UIView I wanted to animate. This worked for my use case, where calling removeAllBehaviors() doesn’t interrupt the other UIView’s behaviors (if any).

Using multiple UIDynamicAnimators isn’t an answer if you have multiple UIViews under the same animator with UICollisionBehavior or other effects that let the UIViews interact with each other.

Using CoreMotion deviceMotion to keep image level example (Xcode 8.3, Swift 3.1)

I’ve been playing around with CoreMotion since it is frankly so cool. I’ve followed NSHipster’s CMDevice​Motion post, but I made some changes to use the latest Swift v3.1. Below is sample code for using both the gyroscope and accelerometer to keep an image level when you rotate your phone.

//
//  ViewController.swift
//
//  Created by Rex on 4/22/17.
//

import UIKit
import CoreMotion

class ViewController: UIViewController {

    let interval = 0.01
    let imageFilename = "bg.jpg"
    let imageWidth = CGFloat(800)
    let imageHeight = CGFloat(1200)
    
    let manager = CMMotionManager()
    var imageView: UIImageView?

    override func viewDidLoad() {
        super.viewDidLoad()

        guard manager.isDeviceMotionAvailable else { return }
        
        setImageView()
        
        manager.deviceMotionUpdateInterval = interval
        let queue = OperationQueue()
        
        manager.startDeviceMotionUpdates(to: queue, withHandler: {(data, error) in
            guard let data = data else { return }
            let gravity = data.gravity
            let rotation = atan2(gravity.x, gravity.y) - .pi

            OperationQueue.main.addOperation {
                self.imageView?.transform = CGAffineTransform(rotationAngle: CGFloat(rotation))
            }
        })
    }
    
    func setImageView() {
        if let img = UIImage(named: imageFilename) {
            let iv = UIImageView(image: img)

            // center the image
            let x = (self.view.frame.width/2)-(imageWidth/2)
            let y = (self.view.frame.height/2)-(imageHeight/2)
            iv.frame = CGRect(x: x, y: y, width: imageWidth, height: imageHeight)
            
            self.view.addSubview(iv)
            self.imageView = iv
        }
    }
    
}

The setup is simple. Create a new Single View Application project in Xcode. You’ll need to add a JPG to the Assets.xcassets folder in the project. Replace the Viewcontroller with the code below and make sure to update the image filename, width, and height constants.

The code hopefully is straightforward. We make sure the CMMotionManager’s device motion is available. Then, we add the imageview (as the only UIView element we’re adding to the screen). We use an OperationQueue to process the rotation calculation off the main queue. Then we update the imageview with a transform on the main queue.

iOS 10 Locales and Currency Symbols – Sample App

While working on adding localization to my tip calculator, one thing that seems obvious in retrospect is the difference between a device’s language & region. iOS lets you set the language & region separately. For example, you might want to read text in English, but you could be in Asia. This is relevant to tipping since you could travel to a country where tipping is expected, but the country your phone’s language is associated with doesn’t traditionally tip.

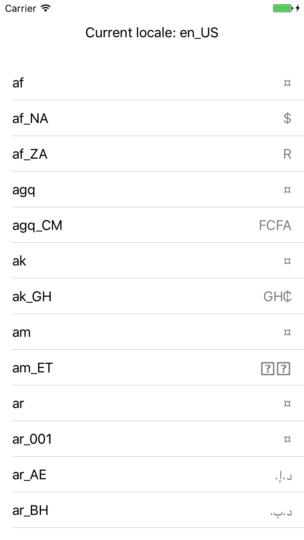
While exploring locales and currency symbols, I whipped together a basic demo app that lets you scroll between all the known locales and their currency symbol in iOS 10. This is pretty useful since you can quickly see what the currencySymbol is for each known iOS locale.

Below is the full implementation of very hacked together (quick and dirty) code. All you need to do:

  • Create new Single View Application project in Xcode
  • Replace the ViewController.swift with below (written for Swift 3)
  • Run the app in Xcode
import UIKit

class ViewController: UIViewController, UITableViewDelegate {
    
    let cellIdentifier = "Cell"
    let currentLocaleHeight = CGFloat(80)
    
    let locales = Locale.availableIdentifiers.sorted { $0.localizedCaseInsensitiveCompare($1) == ComparisonResult.orderedAscending }
    
    override func viewDidLoad() {
        super.viewDidLoad()
        
        let tableView: UITableView = UITableView()
        tableView.frame = CGRect(x: 0, y: currentLocaleHeight, width: view.frame.width, height: view.frame.height)
        tableView.dataSource = self
        tableView.delegate = self
        
        self.view.addSubview(tableView)
        
        addCurrentLocaleLabel()
    }
    
    func addCurrentLocaleLabel() {
        let local = Locale.current.identifier
        
        let width = view.frame.width
        let label = UILabel(frame: CGRect(x: 0, y: 0, width: width, height: currentLocaleHeight))
        label.text = "Current locale: " + local
        label.textAlignment = .center
        view.addSubview(label)
    }
    
}

extension ViewController: UITableViewDataSource {
    
    func numberOfSections(in tableView: UITableView) -> Int {
        return 1
    }
    
    func tableView(_ tableView: UITableView, numberOfRowsInSection section: Int) -> Int {
        return locales.count
    }
    
    func tableView(_ tableView: UITableView, cellForRowAt indexPath: IndexPath) -> UITableViewCell {
        let cell = UITableViewCell(style: .value1, reuseIdentifier: cellIdentifier)
        
        let localeString = locales[indexPath.row]
        
        let numberFormatter = NumberFormatter()
        numberFormatter.locale = Locale(identifier: localeString)
        
        cell.textLabel?.text = localeString
        cell.detailTextLabel?.text = numberFormatter.currencySymbol
        
        return cell
    }

}

Note that the “¤” symbol means the currency is unspecified.

Using Fastlane Snapshot to generate screenshots with UIPickerViews

This week, I released an update for my Tip Solver calculator to add Chinese localization. I had to generate 5 screenshots for 5 devices (iPhone and iPad) across 3 languages. In the time that I spent automating the process with Fastlane Snapshot, I could have easily done it manually in way less time. But the good news is that I’ve set myself up to painlessly generate screenshots for new languages. Snapshot takes some time to run, but it’s still a huge improvement over generating screenshots manually.

It took me a lot longer than I would have liked to setup my Snapshot process due to my usage of UIPickerViews. Tip Solver makes heavy usage of UIPickerView and I ran into many issues with UITest.

Your mileage may vary, but I found I had to do the following to be able to use UITest and UIPickerViews:

  • disable Ads (which run over the network)
  • drastically reduce the number of UIPickerView rows (in numberOfRowsInComponent)
  • use titleForRow instead of viewForRow for UITest running

The last one (using titleForRow) was a complete non starter since I rely on heavy UIPickerView visual customization. Generating screenshots with incorrect picker views defeats the whole point of the exercise.

I tried using the Xcode’s UITest recorder, but I ran into many issues. One glaring issue is that while recording, I was able to swipe the UIPicker up, but when I played it back, it ended up swiping up the Control Center (instead of adjusting the UIPicker). There is a method (adjustToPickerWheelValue), but I found that it only works with titleForRow (which I don’t use). What I would like is an expansion of the XCUIElement API to add a simple increment/move up or down once.

My final solution (aka work around) was to use a combination of Fastlane launch arguments & brute forcing the UIView (via UIViewController viewDidAppear) to generate my screenshots. My work around isn’t ideal, but it gets the job done.

In my Fastlane Snapfile, I was able to define arguments:

launch_arguments([
 "-screenshot 1",
 "-screenshot 2",
 "-screenshot 3",
 "-screenshot 4",
 "-screenshot 5"
])

In my ViewController (running Swift 3), I was able to handle them accordingly:

let screenshot = UserDefaults.standard.string(forKey: "screenshot")
if screenshot == "1" {
    // do something
} else if screenshot == "2" {
    // do something
} else if screenshot == "3" {
    // do something
} else if screenshot == "4" {
    // do something
} else if screenshot == "5" {
    // do something
}

Once everything is setup, generating screenshots was simply running snapshot on the command line.

I’m sure there’s room for improvement in the code (using an enum, etc.), but I left it at that since it’s only for screenshot generation.

If you’ve made it all the way down here, thanks for reading. I just wanted to share my experience with UITest and UIPickers. UITest probably needs more love from Apple as it was not pleasant to work with.

 

How to open phone app from iMessage extension and pass data

This weekend, I spent some time digging into iOS 10 iMessage app extensions.

Creating an iMessage app or sticker pack is relatively easy. Here are a couple of resources for getting started: tutsplus and medium. Apple also has their own example iMessage app.

For a new iMessage only app, you can choose File > New > Project and either ‘Sticker Pack Application’ or ‘iMessage Application’ in Xcode. To add an iMessage extension to your existing containing phone app, you can use File > New > Target and either ‘Sticker Pack Extension’ or ‘iMessage Extension’.

I wanted to understand the current state of user workflow between the iOS (main/phone) app and the iMessage extension app. Apple has it’s work cut out for them. The iMessage App store is an awkward modal triggered from an individual iMessage conversation. Users seem to have trouble locating the store and managing iMessage apps, so apps are getting bad reviews.

The good news is that you can launch your phone app from the iMessage app.

From the iMessage extension app, you can use this (with your own AppName):

guard let url: URL = URL(string: "AppName://?myParam=myValue") else { return }

self.extensionContext?.open(url, completionHandler: { (success: Bool) in
 
 })

Calling the above code will open the phone app. One issue I ran into (under the extension scheme) is that the phone app will crash in the simulator when opened this way. Xcode shows a SIGKILL since the iMessage app connected to Xcode is quit while the phone app is being opened. This appears to only be a simulator issue.

You can access the URL params in your phone app’s App Delegate:

    func application(_ app: UIApplication, open url: URL, options: [UIApplicationOpenURLOptionsKey : Any] = [:]) -> Bool {

        return true

    }

The bad news is that you cannot launch your iMessage app from your phone app. Apple must have been short on time, as their usual modus operandi is to launch headline features that are incomplete and hopefully iterate later if their business still cares. Radar(s) have been filed.

When asked, “Is it possible for my app to open the Messages app with my iMessage extension activated?” An Apple Staff member says, “There currently isn’t a way to do this.”

I think opening your iMessage app from your phone app would be an excellent, natural use case. User does something in the containing app, then they want to share that app’s state with a friend using iMessage. Why rely on the user going to Messages, finding your iMessage app in the correct convo, and then recreating app state to send it over?

So to recap, iMessage apps have a lot of potential as they are living apps within iMessages. They can communicate with their containing app. But I have reservations about the UX, including discoverability.