Tag Archives: xcode

iOS Universal iPad Portrait Gotcha

I wanted to share a small tip that reinforces the necessity of on-device (non-simulator) testing.

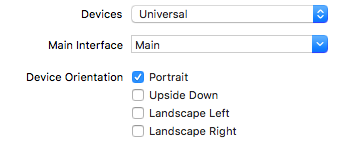
While finalizing my latest iOS app (universal for both iPhone & iPad), I found an issue through manual QA on an actual iPad. I had only left Portrait checked in the Project > General section of Xcode, but my app was somehow running in landscape mode on the iPad.

general

Confused as to why it was rendering in both landscape & portrait mode on my iPad, I found a handy stack overflow post.

For one reason or another, you have to update your Info.plist to only specify portrait settings for iPads. Below is my Info.plist after I updated it to only target Portrait mode.

info_plist

It’s confusing as to why the Project General section’s Device Orientation is not sufficient to force only Portrait orientations and you have to also update the Info.plist.

Through simulator testing, it’s not likely that I would have caught onto this portrait vs landscape issue. I relied mostly on my primary iPhone and copious amounts of simulator testing for the other iOS universal devices.

For the highest level of quality control, you would need an iPhone 4s, iPhone 5, iPhone 6, iPhone 6+, iPad, and iPad Pro. That’s a lot of devices and I certainly don’t have all of those. Sidenote: if you do have all those devices, you would also be positioned to record App Preview videos for all devices natively (AKA lots of work).

Freeing up disk space as an iOS Developer

As an iOS Developer, I often have trouble updating to the latest version of Xcode since my 128GB MacBook Air keeps filling up.

Common culprits include ~/Library/Developer/Xcode/DerivedData and ~/Library/Developer/Xcode/iOS DeviceSupport.

By clearing out those two folders, I’m able to free up 11GB at this time of writing. For more information on what these folders contain, this [LINK REMOVED – see below] was helpful.

May 2021 Edit: This post previously linked to http://ajithrnayak.com/post/95441624221/xcode-users-can-free-up-space-on-your-mac. The link has been removed since the link is now broken.

Logging during development with Apple Watch hardware

Inserting breakpoints or logging statements (such as NSLog) is relatively straightforward with an iPhone-only iOS app. But how do you log from the WatchKit Extension (aka Watch app)?

The good news is that logging isn’t filled with many complicated steps. The bad news is that the logging works intermittently.

  1. Add your NSLog statements in your WatchKit Extension. This is probably your InterfaceController.m
  2. Run the watch app on iOS Device + watchOS Device (in the WatchKit App scheme)
  3. Select Debug > Attach to Process > (click on your watch app name)
  4. Profit! You should see your NSLogs when they are triggered in the app lifecycle in Xcode

debug

If logging isn’t working, try typical Xcode debug steps such as:

  • deleting the app on your phone & re-running it in Xcode
  • restarting the phone and/or watch devices
  • clean Xcode (cmd + shift + k) and re-run the app
  • quit & restart Xcode

Apple GameCenter Implementation Strategy

Having worked on my first app that implements GameCenter, I had a lot of questions about the process. The main question was how do I implement GameCenter into my app? Do I need to pick the right application template when creating my Xcode project? Do I need to use SpriteKit? Etc

The good news is that GameCenter can be added on after the rest of your application is ready. You should focus on your game mechanics, game engine, user friendliness, etc. After you are satisfied with the core experience, you can add GameCenter (leaderboard, achievements, and other features) afterwards. You can choose any application template and you don’t have to use SpriteKit.

In my app, I had both a phone app & a watch app. You will need to implement GameCenter using Apple’s GameKit Framework. GameKit is currently only for the iPhone, so GameCenter logic needs to be called in the Phone app.

I found great Apple documentation with the same advice:

Here’s a reasonable process to follow when designing a game that supports Game Center:

  1. Decide which Game Center features you plan to support.
  2. Define your game mechanics, keeping in mind the requirements and limitations of Game Center.
  3. Implement your game engine, ignoring Game Center for now. Focus on developing the other aspects of your game, such as your game engine and gameplay. You do this to avoid needing to create an iTunes Connect record earlier than you need to.
  4. [implement Game Center]

As with any app, focus on nailing the key user experience. Then worry about implementing/integrating GameCenter in your app.

Setup Apple Watch for Development Guide

While working in Xcode and running my watch app on my actual hardware watch for the first time, I ran into this error on my watch the first time: “Failed to install [app], error: Application Verification Failed.” This stack overflow answer provides the solution, but I wanted help illustrate the steps I took to fix the error. Disclaimer: this worked for me, but there are probably more optimal ways of fixing the error.

  1. In Xcode, get the UDID of your Apple Watch (WIndow > Devices). The UDID is labeled “Identifier” and you can double click on the Identifier device hash to select & copy it.
    1
  2. Visit the Apple Developer Portal at https://developer.apple.com/devcenter/ios/index.action and click on “Certificates, Identifiers & Profiles” in the right sidebar.
    2
  3. Click on Devices > All in the left sidebar.
    3
  4. Click on the Plus Sign (+) in the top right.
    4
  5. In Register Device, provide a Name (whatever you want) and your watch UDID (from step 1 above).
    5
  6. Submit the form to register your watch device.
  7. In “Certificates, Identifiers & Profiles”, locate your .watchkitextension Provisioning Profile for your app. Select & download this profile.
    7
  8. Locate your downloaded profile file on your computer & double click the Provisioning Profile.
  9. Restart Xcode.
  10. Build your project and you will encounter a iOS Development Certificate alert.
    10
  11. Warning, this step may be dangerous (proceed at your own risk). This worked for me. Click on “Revoke and Request”. This will revoke your current certificate and request a new one. You will probably get an email notifying you that “Your Certificate Has Been Revoked”.
  12. Run your Xcode project. Your watch app should now load the development build on your actual watch hardware.

About the author: Rex Feng enjoys iOS development and has released Pomodoro Pro for the iPhone & Apple Watch. You can follow him @rexfeng.

Fix no matching provisioning profiles validation issue

Here’s a quick problem & solution that worked for me. Hopefully this helps others out there.

Situation:

Validating an archive prior to submitting the build to the App Store, but it fails validation. I am using App Groups (for the phone app & watch app).

Problem:

Validating my archive created two “no matching provisioning profiles found” errors. The error was specifically related to “none of the valid provisioning profiles allowed the specified entitlements betareports-active com.apple.security.application-groups”.

Solution:

In my case, my development was able to use App Groups, but the production/distribution environment was not setup yet.

Under Provisioning Profiles > Distribution (https://developer.apple.com/account/ios/profile/), create an Distribution / App Store for each App ID that you need. In my case, I had to create one for the phone app & one for the watchkit extension. Make sure to download each after generating them. Double click on your downloaded files to automatically load them into Xcode.

When I tried to validate my archive again, I was able to successfully validate (after generating & loading my new Provisioning Profiles).

Standing on the Shoulders of Documentation

sprout123

Learning how to build a simple iOS app has not been bad. There’s a lot of learning how to find things in Xcode (protip: get a 2nd screen) and familiarizing myself with UIKit conventions. I completed the bitfountain iOS 7 course and have subscribed to more iOS newsletters than I care to admit.

At a meetup last year, I had a discussion about my choice to start with Objective-C. He asked me why I didn’t jump into Swift or use a tool like PhoneGap. Fast forward several months to today, I’m very happy I went with Objective-C. Whenever I am unsure how to do something in Objective-C, there are endless helpful blog posts and StackOverflow discussions out there. Even blog posts written before 2010 can be helpful. I am truly standing on the shoulders of all those heroic individuals who’ve tread down the path before me years ago.

With Swift, I’m sure there’s great documentation out there, but my guess is that Swift today (the beginning of 2015) cannot compete with the thoroughness of Objective-C edge cases discussed on the Internet.

Access to simple, basic questions like converting a NSUInteger to a NSNumber are essential for those just starting out. I’d like to use the example of an extremely beginner friendly resource, RailsCasts, which taught you how to use run of the mill gems, like Devise, and helped create a new generation of developers. Without a wealth of beginner accessible resources, a language or framework can’t grow or grow as fast.

iOS Programming

I’ve started learning iOS programming. Objective-C seems very low level, but it’s alright as an older object oriented language. Learning the Apple frameworks seems to the be tricky part. There’s a lot for me to learn with using Xcode (since I don’t normally use IDEs) and frameworks like Cocoa Touch.

I spoke to someone recently who suggested skipping Objective-C and going directly to Swift. Or even a tool like PhoneGap. Personally, I side with Aaron Hillegass’ take:

I have three messages for these people:

  • If you want to be an iOS developer, you will still need to know Objective-C.
  • Objective-C is easier to learn than Swift. Once you know Objective-C,
  • it will be easy to learn Swift.

To take a longer perspective on iOS, I want to build my foundation up from Objective-C to iOS. This is similar to how learning Ruby is critical for being a Rails developer.

With that said, I’m eager to get my hands dirty with iOS prototypes through different online courses.

iOS Simulator

When previewing a site on my iPhone (1136 x 640), I wasn’t satisfied with using my iPhone 5 or a Chrome browser Window Resizer app.

Turns out it’s super simple to use the iOS Simulator with Xcode on OS X (version 10.8.5).

Select Xcode > Open Developer Tool > iOS Simulator

xcode

You’ll be presented with an iPhone to navigate within. Select Safari and you can use a site like localhost:3000 for development.

 
ios_sim